Last Updated: October 23, 2026
Quick Summary
To minimize dust during kitchen demolition, seal the work zone with 4-6 mil plastic sheeting and zipper doors, shut off the HVAC and cover vents, and capture dust at the source with a HEPA vacuum and light misting. Knowing how to minimize dust during kitchen demolition means containment first, filtration second.
- Hang 4-6 mil plastic sheeting over every opening and seal all seams with tape.
- Turn off central air at the thermostat and cover supply and return vents before demo.
- Mist surfaces before cutting or prying, but never soak them.
- Target at least 6 air changes per hour and place the purifier in the clean zone.
- Skip the broom and HEPA vacuum surfaces before damp wiping.
Table of Contents
- Why Kitchen Demolition Dust Spreads Through Your Whole Home
- How to Contain Construction Dust: Sealing the Work Zone Before Demo Day
- How to Reduce Dust During Demolition: Source Capture and Low-Dust Work Practices
- Protecting Your HVAC System, Vents, and Indoor Air Quality
- Choosing an Air Purifier for Construction Dust
- How Long Construction Dust Lasts and How to Clean It Up
- DIY Containment vs. Professional Dust Control
- Frequently Asked Questions
Why Kitchen Demolition Dust Spreads Through Your Whole Home
Kitchen demolition dust travels farther than most homeowners expect. It rides the air currents from your central HVAC system, slips under door gaps, and settles on every surface in the house.
Construction dust is the mix of airborne particles and settled dust created when crews break apart cabinets, tile, drywall, and countertops. It is not one material. It is many, and each one behaves differently.
What Construction Dust Is Made Of and Why It Matters
- Drywall dust: fine, chalky, and light enough to float for hours
- Silica dust: released when cutting concrete, tile, or stone; a real health hazard
- Wood dust: heavier, settles fast, but piles up quickly
Each material needs the right control. Drywall dust laughs at a broom. Silica dust demands more than a cloth mask. Knowing what you are breaking apart tells you how to contain construction dust before the first hammer swing.
How to Contain Construction Dust: Sealing the Work Zone Before Demo Day
Seal the kitchen before demolition starts, not after. The work zone should be closed off with plastic sheeting, sealed doorways, and a protected exit path so remodeling dust never reaches living spaces. Prep work takes a few hours and saves weeks of cleaning.
Plastic Sheeting, Zipper Doors, and Sealed Doorways
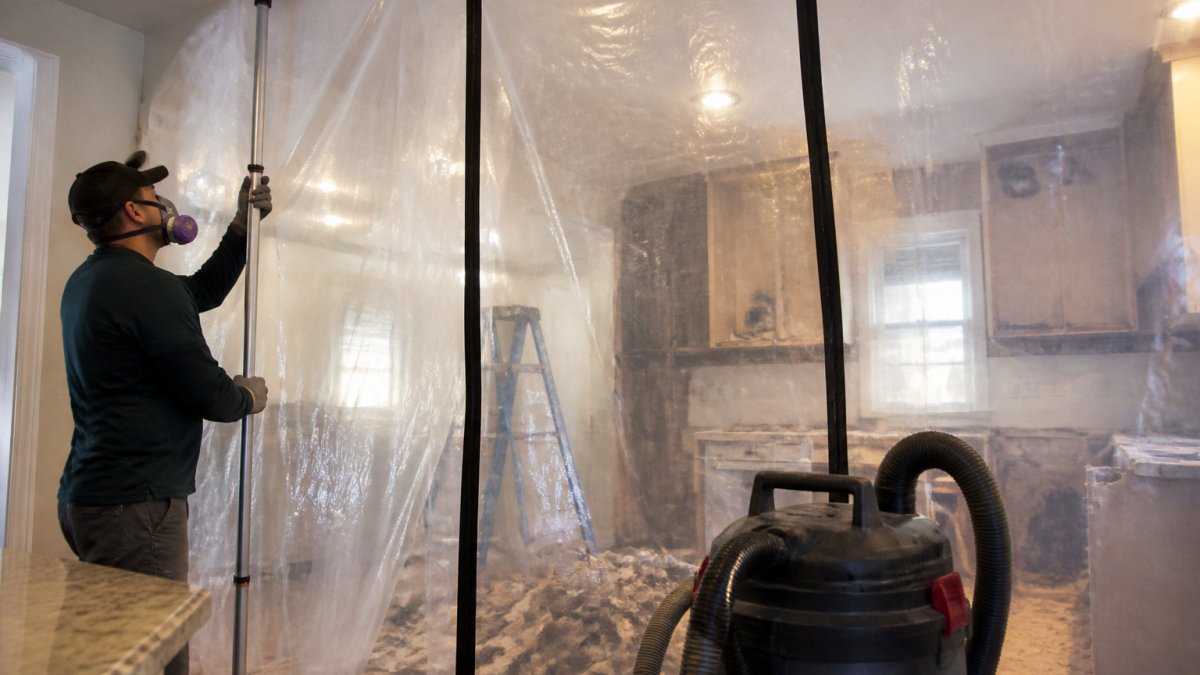
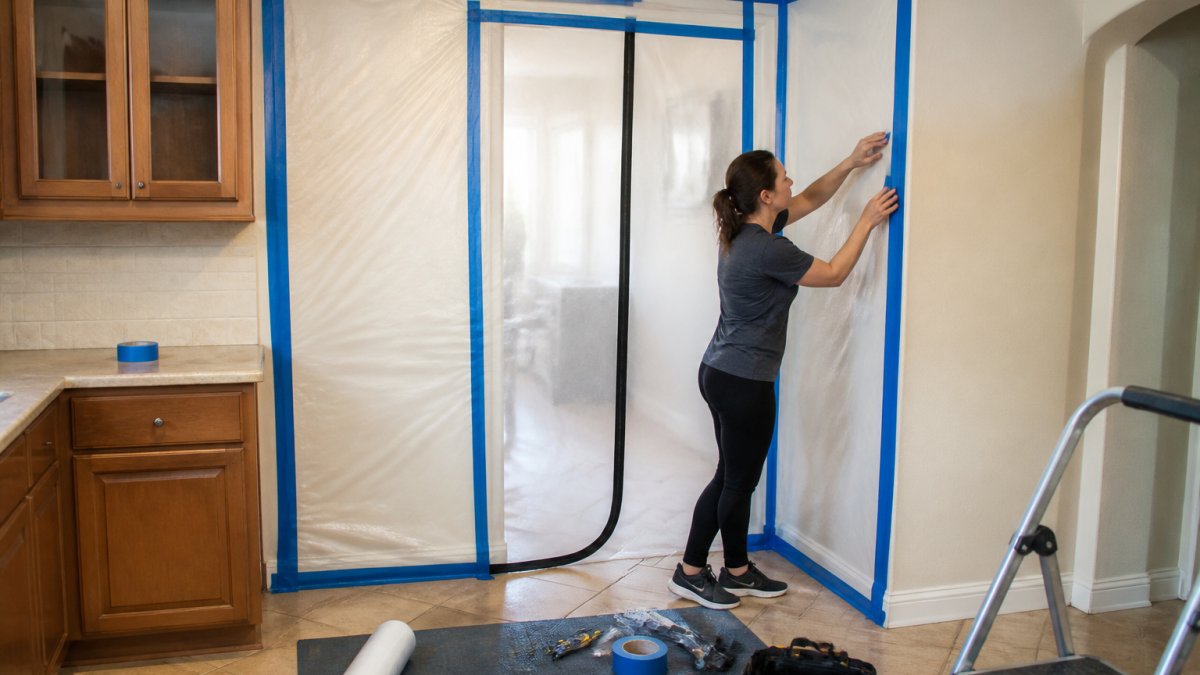
Hang heavy plastic sheeting over every opening between the kitchen and the rest of the house. Tape plastic along all edges, then seal seams so nothing escapes through gaps.
- Use 4-6 mil plastic sheeting for durability
- Install a zipper door so workers can pass through without unsealing the barrier
- Tape the sheeting to the floor and ceiling, not just the sides
A dust barrier is only as good as its weakest seam. Check every edge before demo day.
Protecting the Exit Path and Floors
Debris removal is where containment often fails. Every trip out of the kitchen can drag dust through the house.
- Lay protective covering or floor protection along the entire exit path
- Tape down the edges so it does not shift
- Use a sticky mat at the barrier exit to trap dust from shoes
Protect furniture near the route with drop cloths too. Dust migration follows foot traffic as much as air.
How to Reduce Dust During Demolition: Source Capture and Low-Dust Work Practices
Capture dust where it is created, not after it settles. Source capture means hooking tools to a vacuum, misting surfaces before you break them, and working in a controlled sequence. These low-dust work practices cut airborne particles dramatically.
Here is how to reduce dust during demolition with a simple workflow:
- Mist surfaces with water before cutting or prying
- Attach a HEPA vacuum or shop vacuum to saws and sanders
- Score and cut instead of smashing when possible
- Lower debris gently into bags or bins, never toss it
- Vacuum debris as you go, not at the end of the day
For a deeper set of techniques, consider ways to minimize dust during home renovation that build on these source-capture basics.
Mist, don’t soak. A light spray holds dust down. Too much water turns drywall dust into a paste that clogs your vacuum filter in minutes.
Wear a dust mask or respirator during demo, and keep the barrier sealed while work is active.
Protecting Your HVAC System, Vents, and Indoor Air Quality
Your HVAC system is the fastest route for dust to reach every room. Turn off central air before demolition begins, then seal every vent and return vent inside the work zone. This one step protects indoor air quality across the whole house.
Turning Off Central Air and Sealing Return Vents
- Shut off the HVAC system at the thermostat before demo starts
- Cover supply and return vents in the kitchen with plastic and tape
- Change the HVAC filter after demolition, not during
Dust pulled into ductwork can recirculate for weeks. Sealing vents is cheap insurance. If your system runs during demo, you are spreading dust into clean rooms yourself.
Running central air during demolition pulls fine dust into your ducts and blower. That dust can recirculate through the house long after the kitchen is done, and duct cleaning is far more expensive than a roll of tape.
Choosing an Air Purifier for Construction Dust
Most guides stop at “use a HEPA purifier.” That is not enough to actually keep fine drywall and silica dust out of your living space. You need to size the unit, place it correctly, and understand how it interacts with your containment barrier. Here is the practical version.
Match the Unit to the Room, Not the Whole House
Air cleaners are rated by clean air delivery rate (CADR), expressed in cubic feet per minute (CFM) for smoke, dust, and pollen. The higher the CADR, the faster the unit processes air.
To estimate the CFM you need:
- Measure the volume of the room you are protecting in cubic feet (length × width × height).
- Multiply by your target air changes per hour (start with 6 for dusty demolition).
- Divide by 60 to convert to cubic feet per minute.
Example: a 12 ft × 15 ft room with 8 ft ceilings is 1,440 cubic feet. At 6 ACH, that is 1,440 × 6 ÷ 60 = 144 CFM.
Placement and Exhaust Direction Matter More Than the Filter Alone
A HEPA filter in the wrong spot just cleans the dirty side of the plastic. Place the air scrubber or purifier in the clean zone just outside the barrier, pulling air away from the containment and exhausting filtered air back into the clean space. If you are using negative air pressure, the machine should exhaust outdoors or into a filtered return so the work zone stays under negative pressure relative to the house.
- Keep the intake at least a few feet off the floor and away from corners where dust settles.
- Do not place the unit where it blows across an open doorway into clean rooms.
- Run it continuously during demo and for several hours after debris removal.
Filter Ratings and Replacement Cadence
Look for a true HEPA filter rated to capture 99.97% of particles at 0.3 microns (What is a HEPA filter? | Indoor Air Quality (IAQ)). Many “HEPA-type” or “HEPA-like” labels do not meet that threshold. During active demolition, plan to inspect the pre-filter every day and replace it when you see visible loading or a drop in airflow. The main HEPA filter typically needs replacement after the project, not during, unless airflow falls off noticeably.
A purifier running inside a sealed work zone does not protect the rest of the house. It only cleans the air it can reach. Containment first, filtration second.
Size for at least 6 air changes per hour in the protected zone, place the unit in the clean zone pulling away from the barrier, and check the pre-filter daily. Filtration supports containment, it does not replace it.
How Long Construction Dust Lasts and How to Clean It Up
Construction dust can linger for weeks after demolition ends. Fine particles settle slowly, and every footstep stirs them back up. Expect to clean in rounds: a first pass during demo, a deep clean after debris removal, and touch-ups for days after.
Damp Cleaning, HEPA Vacuuming, and Wipe Down
- HEPA vacuum floors, ledges, and vents before any sweeping
- Damp cleaning with a sponge mop traps settled dust instead of spreading it
- Wipe down walls, cabinets, and trim with a damp cloth
Skip the broom. Dry sweeping launches settled dust right back into the air.
| Cleanup Stage | Method | When |
|---|---|---|
| During demo | HEPA vacuum + misting | Daily |
| After debris removal | Damp wipe + sponge mop | Same day |
| Final pass | Wipe down all surfaces | 2-3 days after |
| Follow-up | Vacuum vents and floors | Weekly for 2-3 weeks |
DIY Containment vs. Professional Dust Control
DIY containment can work for a small cabinet swap or a single-wall tear-out. A full kitchen demolition is a different job. The decision comes down to three things: the materials you are disturbing, the size of the work zone, and whether you can maintain negative pressure and sealed containment for the entire project.
A Demolition-Specific Dust-Control Checklist
Use this sequence to decide whether your plan is DIY-ready or needs a professional:
Before demo day
- Identify what is being removed: drywall, tile, mortar, concrete, wood, insulation, or adhesives.
- Check for hazardous materials before disturbing anything. Homes built before 1980 may contain asbestos in flooring, joint compound, or insulation; older paint may contain lead. Testing is the only reliable way to know.
- Confirm you can seal every opening, protect the exit path, and shut down the HVAC.
During demolition
- Keep the barrier sealed and the HVAC off.
- Capture dust at the source with a HEPA vacuum or tool-attached extraction.
- Mist surfaces before cutting or prying; do not soak.
After demolition
- HEPA vacuum all surfaces before any damp wiping.
- Damp clean with a sponge mop and damp cloths; skip the broom.
- Replace HVAC filters and restart the system only after cleanup is complete.
When DIY Is Reasonable, and When It Is Not
DIY is reasonable when the scope is small, the materials are low-risk, you can seal the zone completely, and you have a true HEPA vacuum and a plan for debris removal. It becomes risky when any of the following is true:
- The demolition disturbs large amounts of drywall, tile, mortar, or concrete, which generate fine silica and gypsum dust.
- The home predates 1980 and hazardous materials have not been tested.
- The kitchen is open to the rest of the house and you cannot maintain a sealed barrier.
In those cases, professional crews bring proper negative air pressure, air scrubbers, and safe handling of hazardous materials. They also carry the equipment to verify containment is holding, which is hard to do with household tools.
If you are leaning toward hiring help, see how our non-disruptive kitchen remodeling services manage dust for you.
Homeowners staying in the house during a full kitchen demolition, where dust migration and HVAC protection matter most.
At Remodeling Pros, our Last Day Breakthrough system keeps your original structure intact until the last moment, so you keep enjoying your home during construction. For practical guidance on living in house during major renovation, see our dedicated guide. That approach pairs well with tight dust containment.
Frequently Asked Questions
How long does construction dust last after a kitchen demolition?
How long construction dust lasts depends on containment and cleanup. Visible airborne particles settle within hours, but fine dust can stay suspended for days and resettle on surfaces for weeks. Sealed doorways, negative air pressure, and a HEPA vacuum cut that timeline significantly. Plan on daily damp cleaning during demolition and a full wipe down of adjacent rooms for two to three weeks after work ends. If you skip HVAC protection, dust can recirculate through the system for months.
Do air purifiers help control dust during kitchen demolition?
Yes, when sized correctly. An air purifier for construction dust needs a HEPA filter rated for fine particles and a clean air delivery rate matched to the room’s square footage. Place it inside the work zone or just outside the barrier to catch particles escaping containment. Air purifiers supplement source capture and sealed barriers, they do not replace them. Change or clean the filter often during demolition, since construction dust loads filters fast.
What protective equipment should I wear during kitchen demolition?
Wear an N95 or P100 respirator, safety glasses, and work gloves. Drywall dust and silica from concrete or tile are the biggest respiratory risks, and a basic cloth mask does not filter them. Add hearing protection if you are using a hammer drill or demolition saw. Change out of dusty clothes before walking through the rest of the house, and shower after demo sessions to keep dust out of living areas.
How do I keep dust from spreading during a kitchen renovation?
Seal the kitchen doorway with plastic sheeting and a zipper door, cover the exit path with floor protection, and tape off HVAC vents and returns. Capture dust at the source with a shop vacuum fitted with a HEPA filter while cutting or breaking material. Set up negative air pressure with an air scrubber so air flows into the work zone, not out. Damp wipe surfaces daily and avoid dry sweeping, which sends settled dust back into the air.