Table of Contents
- Why Dust Control Matters During Renovation
- 1. Create Dust Barriers for Home Renovation Work Areas
- 2. Protect Your HVAC System from Construction Dust
- 3. Deploy Air Filtration During Construction
- 4. Contain Dust at the Source
- 5. Protect Floors and Surfaces in Adjacent Rooms
- 6. Clean Dust After Renovation Properly
- 7. Establish a Daily Cleanup Routine
- Frequently Asked Questions
Last Updated: October 10, 2026
Why Dust Control Matters During Renovation
Home renovations transform your space, and your air quality. Construction dust spreads far beyond the work zone, settling on furniture, infiltrating HVAC systems, and triggering respiratory issues. It’s a health concern that compounds over weeks of active work.
This guide covers practical steps to keep dust contained and your home livable during construction. The difference between a dusty nightmare and a manageable project comes down to preparation and execution.
Most homeowners underestimate how aggressive dust control needs to be. A few plastic sheets and a closed door aren’t enough. Real dust mitigation requires layered barriers, HVAC protection, active filtration, and consistent daily cleanup.
Here are the 7 ways to minimize dust during home renovation that actually make a difference.
Start dust control BEFORE demolition begins. Set up barriers, seal HVAC returns, and position air scrubbers before the first wall comes down. Retrofitting containment mid-project is expensive and ineffective.
1. Create Dust Barriers for Home Renovation Work Areas
The foundation of dust control is physical separation. Isolate the renovation zone using airtight barriers to stop dust at the source. Plastic sheeting alone isn’t enough, it must be sealed completely with access doors and strategic tape placement to create a true containment zone.
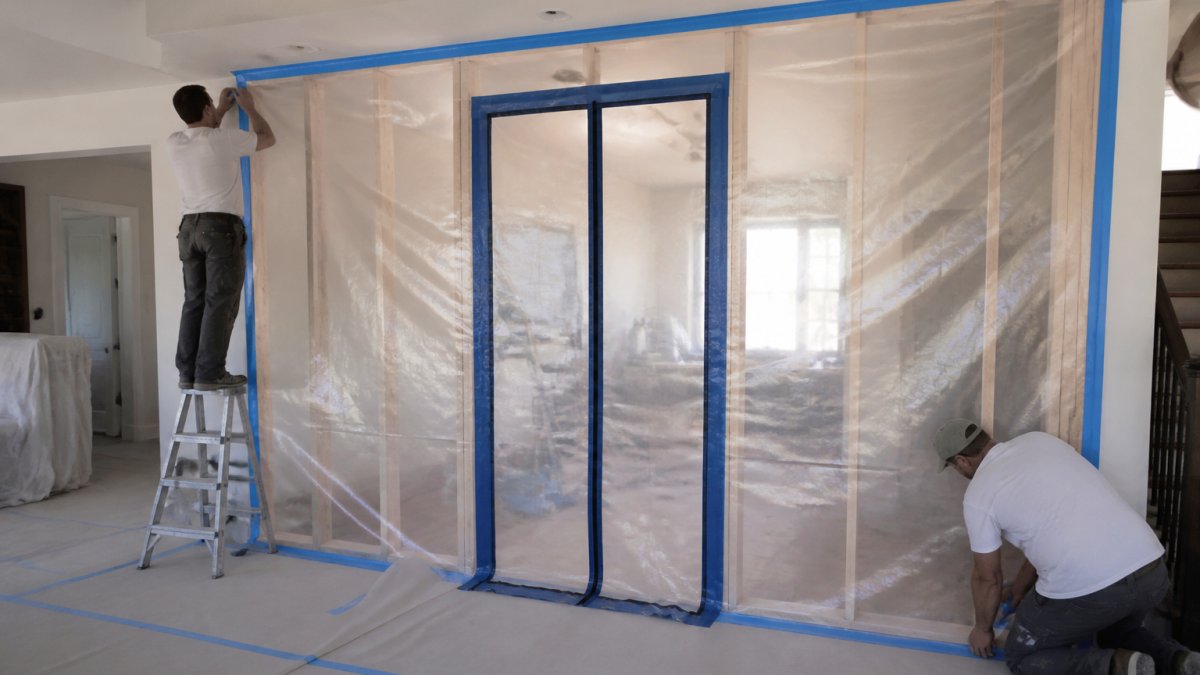
Plastic Sheeting and Zip Walls
Start with heavy-duty plastic sheeting (6 mil minimum) stapled to studs, joists, and framing. Zip walls are the professional upgrade, spring poles and plastic panels create rigid, repositionable barriers with tighter seals and faster installation than standard plastic.
Sealing Edges and Installing Access Doors
Tape every seam where plastic meets walls, ceilings, and floors on both sides to prevent air leaks. Install a zipper door for worker access, positioning it on the side farthest from living spaces to create a buffer zone.
Gaps in barriers are where containment fails. A single unsealed seam lets dust escape continuously. Inspect your barriers daily and retape any gaps that form as plastic shifts during construction.
2. Protect Your HVAC System from Construction Dust
Your HVAC system is a dust highway if left unprotected. Air returns pull dust directly into ductwork, distributing it throughout the home. Blocking this path is critical to keeping the rest of your home livable.
How Dust Infiltrates HVAC Systems
Construction dust (often smaller than 10 microns) is pulled into unsealed returns by negative pressure, even with doors closed. Dust accumulates on evaporator coils, reduces cooling efficiency, and clogs filters. In homes with people who have asthma or allergies, HVAC-distributed dust triggers symptoms weeks after construction ends.
Sealing Return Vents and Supply Registers
Identify all air returns in and adjacent to the work zone and seal them completely with tape or plastic sheeting, covering entire grille openings. Do not seal supply registers, these must remain open to prevent dangerous pressure imbalances and backdrafting in gas appliances.
HVAC Shutdown vs. Continuous Operation
Turn off the HVAC system during heavy demolition (typically the first 2-3 days) to eliminate the pressure differential that pulls dust into returns. If you must keep it running, seal all returns with tape, upgrade to a MERV 13 filter, change filters every 2-3 days, run on lower fan speed, and consider operating only during non-work hours.
Professional Ductwork Inspection and Cleaning
After construction ends, have a professional HVAC contractor inspect ductwork with a video camera and perform duct cleaning if significant dust is present. Duct cleaning ($300-$500) uses high-powered vacuums and brushes to remove debris from ducts, evaporator coils, and blower housing. This is especially important if anyone has respiratory sensitivities or if the renovation involved heavy demolition.
Filter Replacement Strategy
After duct cleaning, install a new MERV 13 filter before resuming normal HVAC operation. For the first month after construction, change filters every 2-3 weeks, then return to a monthly schedule.
Never seal both returns and supplies. This creates a dangerous pressure imbalance that can cause backdrafting in gas furnaces, water heaters, or fireplaces, potentially allowing carbon monoxide to enter living spaces. Seal returns only; keep supplies open.
HVAC protection is as critical as physical barriers. A sealed return system combined with filter upgrades and post-construction duct cleaning prevents dust from becoming a long-term air quality problem in your home.
3. Deploy Air Filtration During Construction
Industrial-grade air scrubbers pull dust-laden air through HEPA filters and return clean air. Position one in the renovation zone and a secondary unit in adjacent living spaces. Run continuously during construction and for several hours after work ends each day. Replace HEPA filters as they clog; check weekly during heavy demolition.
A single industrial air scrubber positioned in the work zone removes more dust than all your other containment efforts combined. This is the single most effective tool for protecting your home during renovation.
4. Contain Dust at the Source
Demolition, drywall cutting, concrete grinding, and tile removal generate the most dust. Wet methods reduce dust by 80% or more. For dry work, use dust collection equipment with shrouds and vacuum attachments. Schedule dustiest work for days when you can leave the home, or seal yourself in a room with air filtration.
5. Protect Floors and Surfaces in Adjacent Rooms
Lay plastic sheeting on hallway floors to catch dust tracked by workers; replace weekly. Cover furniture, light fixtures, and electronics in adjacent rooms. Close doors between work zone and living spaces, sealing gaps with towels or weatherstripping. For doorways that must remain open, install a plastic barrier with a zipper door.
6. Clean Dust After Renovation Properly
End-of-project cleanup is fundamentally different from daily cleaning. Dust has settled everywhere, and the wrong cleanup method can redistribute fine dust back into the air, undoing weeks of containment work.
Why Standard Vacuums Fail
A conventional household vacuum recirculates fine dust particles (smaller than 10 microns) back into your home, potentially worsening air quality. A HEPA-filter vacuum captures particles as small as 0.3 microns with 99.97% efficiency and is the only vacuum type suitable for post-renovation cleanup.
The Cleanup Sequence: Dry to Wet
Follow this sequence to avoid redistributing dust:
Day 1: HVAC and Ductwork (Before Vacuuming)
Schedule professional duct cleaning before vacuuming. Have the contractor clean main trunk lines, branch ducts, evaporator coil, and blower housing. Install a new MERV 13 filter and leave the HVAC system off for at least 4 hours while dust settles.
Day 2: Vacuuming with HEPA Filtration
Wait at least 12 hours after construction ends before vacuuming to allow airborne dust to settle. Use a HEPA-filter vacuum on all surfaces: floors, shelves, countertops, windowsills, furniture, closets, ceiling corners, and vents. Vacuum systematically from far end toward exit. Empty the collection bin into a sealed bag before it becomes full.
Day 3: Damp Wiping (Wet Cleanup)
After vacuuming, use a damp microfiber cloth or cloth dampened with 50/50 water and white vinegar to capture electrostatically-clinging dust. Wipe light fixtures, ceiling fans, door frames, window sills, baseboards, and hard furniture surfaces. Rinse cloth frequently in clean water.
Day 4: Final HVAC System Startup
Once vacuuming and damp wiping are complete, you can safely turn on the HVAC system. The new filter will capture any remaining airborne dust. Run the system for 2-3 hours with all doors open to circulate air through the home and distribute the new filter’s dust-capture capacity evenly.
Handling Dust in Protected Areas
If you covered furniture or items with plastic sheeting during construction, remove the plastic carefully. Dust has accumulated on the plastic surface. Fold the plastic inward as you remove it, trapping dust inside the bundle. Dispose of it in a sealed bag.
Do not shake out plastic sheeting outdoors, this sends dust into the air and defeats the purpose of containment. Fold, seal, and dispose.
For items under plastic that have dust on them, wipe with a damp cloth before moving them back into place.
Cleaning Tile, Grout, and Porous Surfaces
Dust embeds in grout lines and porous materials like unfinished wood or stone. Vacuuming alone won’t remove it.
For tile and grout, use a damp cloth or mop with a grout-specific cleaner. For porous surfaces, a slightly damp cloth works, but avoid over-wetting wood or stone, which can cause staining or damage.
If the renovation involved significant sanding or concrete cutting, consider a professional post-construction cleaning service. These contractors use industrial equipment and techniques to remove embedded dust from difficult surfaces.
Dust in Hidden Areas
Dust settles in places you might not think to clean:
- Inside cabinet doors and shelves
- Behind appliances
- On top of door frames and crown molding
- Inside light fixtures (turn off power before opening)
- On the tops of ceiling-mounted vents and returns
Use a step ladder to reach high areas. A damp cloth on an extension pole helps you clean ceiling areas safely.
Post-Cleanup Air Quality Check
After completing the cleanup sequence, leave windows open for 24 hours to allow any remaining airborne dust to escape. This is especially important if anyone in the home has respiratory sensitivities.
If you notice dust settling on surfaces again in the days after cleanup, it indicates dust is still being released from the HVAC system or from areas you missed. Run the HVAC system with the new filter for another 24-48 hours and repeat damp wiping on visible dust surfaces.
Proper post-renovation cleanup requires patience and the right tools. HEPA vacuuming followed by damp wiping, combined with professional duct cleaning, removes 95% or more of construction dust and prevents it from becoming a lingering air quality problem.
7. Establish a Daily Cleanup Routine
Dust control isn’t a one-time setup. It requires daily attention throughout the project. A consistent routine keeps dust from accumulating and spreading.
Sweep the work zone floor at the end of each workday. Use a damp broom or mop rather than dry sweeping, which sends dust airborne.
Wipe down plastic barriers and access points. Dust accumulates on surfaces and can be disturbed by movement. A quick wipe removes settled dust before it becomes airborne again.
Check and reseal any gaps that formed in barriers during the day. Plastic shifts as workers move through the space. Gaps appear and grow if not addressed immediately.
Replace air scrubber filters if they’re visibly clogged. A saturated filter reduces effectiveness by 50% or more. Check filters every 2-3 days during heavy work phases.
Have workers clean their shoes and clothing before leaving the work zone. Dust tracked out on shoes spreads contamination.
Daily cleanup checklist:
- Sweep and damp-mop work zone floor
- Wipe down plastic barriers
- Check and reseal barrier gaps
- Inspect air scrubber filters
- Clean worker entry/exit area
- Verify HVAC returns remain sealed
- Spot-check adjacent rooms for dust
Daily cleanup prevents dust from accumulating and spreading. Fifteen minutes of end-of-day work saves hours of cleaning once the project ends.
Dust during home renovation feels inevitable, but it’s not. With proper barriers, HVAC protection, active filtration, and daily cleanup, you control the dust rather than letting it control your home.
At Remodeling Pros, we’ve built dust control into every project through our surgical demolition techniques and comprehensive containment protocols.
Frequently Asked Questions
How do you minimize dust during home renovation?
The most effective approach combines multiple strategies: seal the work area with plastic sheeting and zip walls, protect your HVAC system by closing vents and sealing returns, run industrial air scrubbers continuously, contain dust at the source with wet cutting methods, and establish a daily cleanup routine. Professional contractors using surgical demolition techniques can further reduce dust spread. The key is layering these methods rather than relying on any single approach.
Should you turn off your HVAC system during renovation?
You don’t need to turn it off completely, but you should seal return air vents in the renovation zone with plastic and tape to prevent dust from circulating through your ductwork. This keeps contaminated air from spreading to clean areas of your home while maintaining climate control in occupied spaces.
What is the best way to clean dust after renovation?
Start from top to bottom: dust ceiling fans, light fixtures, and high surfaces first, then work downward. Use a HEPA-filter vacuum for floors and surfaces rather than sweeping, which stirs up fine particles. Wipe down walls and baseboards with damp cloths.
How effective are air filtration systems at reducing construction dust?
Industrial air scrubbers with HEPA filters can capture 99.97% of particles as small as 0.3 microns. Running one continuously in the work area significantly reduces dust spread to other rooms. For best results, combine air filtration with physical barriers, filtration alone cannot prevent all dust from escaping a poorly sealed work area.